Category: food

  • moo!

    Only tangentially knitting-related, I just got my first batch of Moo cards!

    all my moo

    I got twelve different images, mostly yarn/knitting, but a couple garden and other (the water and fire photos). I love them to bits! They’re so tiny and cute!

    I also picked up a little red felt holder at the same time, which holds about 14 cards.

    moo!

    But once I held the cards, I knew I wanted something a little heftier. So I just ordered a leather MooPocket from Etsy! Gosh I love the handmade. I could’ve sewn a holder myself, but meh. Not really up to it.

    In knitting news….I am knitting. A lot. But I can’t tell you about it yet : ( All will come to light soon!

    So…how about another recipe?

    mmmmm, cake

    Flourless Chocolate Cake

    Okay, so flourless chocolate cake is *done*, perhaps to the point of overkill. But this particular one is a new classic recipe in my repertoire – it makes a nice small cake, doesn’t use a huge amount of eggs, is rich and chocolately and not too sweet, and it has a great dense texture. Kind of like a brownie, but a bit denser than I like my brownies. It’s also gluten-free. And I baked it in the toaster oven!

    Ingredients:
    5 one-ounce squares of baking chocolate, a mixture of unsweetened and semi-sweet
    1/2 cup butter
    3/4 cup white sugar
    3 eggs, beaten
    1-2 tsp vanilla (I don’t even measure anymore)
    1/2 cup cocoa (I used Valhrona)

    Make it:
    1. Preheat your oven (or toaster oven) to 300 degrees F and grease an 8″ round baking dish (I used Pyrex).

    2. Melt the chocolate (chopped) and butter together in the microwave or over a double boiler in a large-ish bowl.

    3. Mix in the sugar, cocoa, vanilla and eggs until smooth.

    4. Pour it into the pan and bake for approximately 30 minutes.

    That’s it! Super simple. For best effect, serve warm with vanilla ice cream and a generous sprinkling of cinnamon over everything. Yum!

  • eye on the prize

    You know what the problem is with having so many projects on the go? It’s really easy to not finish anything. But I’m determined to get some of the sweaters I’ve got going done soon…so I cast on for some new ones! That sounds like a good rule, no new sweaters until I finish the old ones.

    top-down raglan

    The top-down raglan’s coming along nicely, I’m just below the underarm split.

    oh, the ends.

    The ends, however…I wonder if I’d be able to bribe Denny into weaving them in for me with the promise of homemade white chocolate peanut butter cups?

    All this sweater knitting stuff will have to be wrapped up really soon, because I’ve got oodles of secret knitting to do. No wonder I hardly have anything to blog about these days (except food).

    secret knitting

    That’s lots of Socks The Rock, in lightweight and heavyweight.

    So, speaking of which – how about a new recipe? The one’s a dessert. Mmm.

    lemon almond cake with blueberry sauce

    Lemon-Almond Cake with Lemon Blueberry Sauce

    Yummy! This cake is very simple to make, and is gluten and dairy free. I couldn’t quite get the almonds as fine as I would’ve maybe liked, but the texture was pretty good anyway. Next time I’d maybe use a cup of pre-ground almond meal. I jacked up a recipe I found online, and made it mightily more lemony. The sauce is pretty tart, so the whole thing is a lemon extravaganza!

    Cake Ingredients
    1 1/3 cups almonds (I used roasted whole)
    8 T white sugar, divided
    zest of 2 lemons
    juice of 1 lemon
    1/2 t cinnamon
    pinch of salt
    4 eggs, separated

    Method
    1. Preheat the oven to 375 F and grease a 9″ cake pan. I used a Pyrex dish. And butter, which obviously negates the dairy-free-ness of this recipe! Spray would be totally fine.

    2. Finely grind the almonds with 2 T sugar in the food processor.

    3. Mix the yolks, 2 T sugar, cinnamon, salt, lemon zest and juice in a large bowl. Add the almond mixture and stir.

    4. Whip egg whites to soft peaks, then slowly incorporate 4 T sugar. Whip until hard peaks form.

    5. Stir half the egg whites into the almond mixture to lighten it, then gently fold in the other half of the whites until just combined.

    6. Pour into baking dish and bake for 30 minutes or until a toothpick comes out clean.

    Lemon Blueberry Sauce

    Ingredients
    1/2 pint blueberries
    1/3 cup lemon juice
    1/3 cup sugar

    Put everything in a small saucepan and simmer until thick. Once it’s refrigerated, the texture becomes thicker like a jam, but I just reheat it to have with the cake!

    galleries cheerleader nude movieporn movie gallerymovies porn free forpuke moviessapphic movies rightsapphic wives moviesmovies ever scariesttaboo incest movies Map

  • by popular demand!

    Wow! Quite a few people have asked for my homemade paneer and mattar paneer recipes after checking out my Flickr photostream (all is back to normal, of course). So without further ado –

    homemade paneer patty

    Homemade Paneer

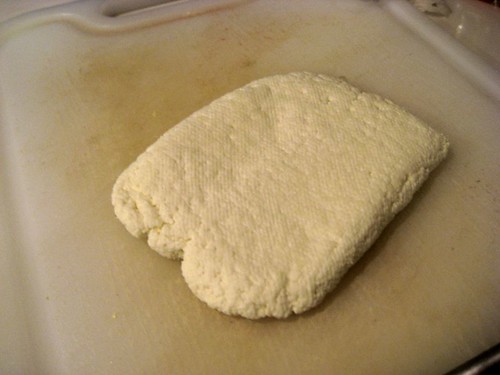
    Okay, so this is THE easiest cheese ever. For those who aren’t familiar with it, paneer is an Indian fresh (unripened) cheese with a dense texture and milky flavour. It doesn’t melt when heated (within reason) which makes it super cool! This amount makes the patty above, approximately 15 cm x 10 cm x 1.5 cm, enough for two people (or one, if you’re me). Very very easy to upsize, of course.

    Ingredients
    1 L (or quart) homogenized (whole) milk – 3.25% MF
    2 tbsp lemon juice or white vinegar

    Line a colander over a bowl with several layers of cheesecloth. Heat the milk in a heavy medium pot over medium-high heat. When the milk comes to a boil, turn the heat off and stir in the lemon juice. The milk should curdle pretty much right away, with the white curds separating from the greenish, thin whey. If it doesn’t want to go, add a little more acid.

    Drain the curds into the colander and let the whole thing cool down for a little bit. Twist the cheesecloth up into a bundle to squeeze off more of the whey, then press the bundle – I pressed the cheese into a disc for a few minutes, then shaped it into more of a rectangle, re-wrapped the cheesecloth around it, then put a small plate and a couple cans on top. Press for at least half an hour, maybe an hour. Ready to become…
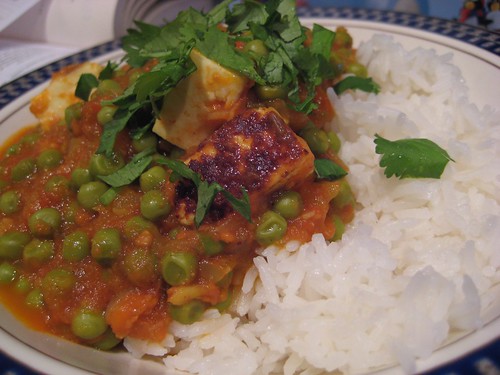
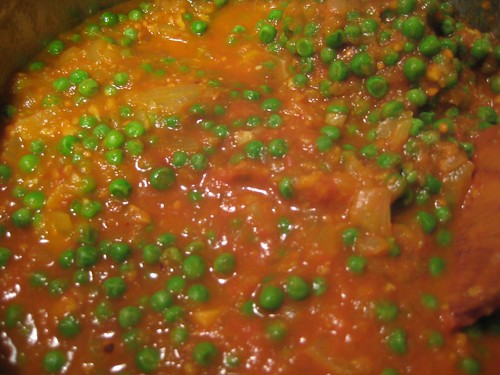
    mattar paneer, done!

    Mattar Paneer

    Mattar paneer is an Indian dish which translates to “peas and cheese” (guess which word means peas!). This is a medium-spicy dish, which you can, of course, adjust to your level of spice tolerance. I referenced my good friend Vivek for his recipe, but made a few procedural changes – supremely un-authentic, most likely, but easiest for me. This dish is a little time-consuming, but soooo yummy.

    Ingredients [my notes in brackets]

    Two large or three medium onions, chopped [I used one very large one]
    Four large tomatoes, chopped (approx 750 ml of tomatoes) [I used home-canned ones from last year’s garden!]
    Four cloves of garlic, chopped
    Three green chilies, chopped (each about 4 cm long)
    One inch of ginger, chopped [I grated mine]
    10 ml cumin powder (or 25 ml whole cumin)
    5 ml ground coriander
    5 ml turmeric powder
    2.5 ml cayenne pepper
    7.5 ml garam masala
    four cardamom pods, crushed (optional)
    10 ml salt
    400 g or so peas, frozen or fresh and shelled
    300 g paneer cheese, chopped into 2 cm cubes [I used 1 recipe of paneer, but you could always add more!]
    coriander to garnish (optional)

    Method

    1. Heat some oil in a medium heavy pan over medium heat. Sweat off the onions slowly until they are translucent, at least 10 minutes. Add the garlic and ginger (I grated my ginger) to the pot and cook for another minute or two.

    2. Push the onions all off to one side of the pan and heat a touch more oil in the bottom. Add the cumin, coriander, cardamom, turmeric, and cayenne pepper to the oil and fry through for a few seconds until fragrant. Mix the spices into the onions and add the chilies.

    3. Add the tomatoes to the pot. Take the stick blender to the whole thing and give it all a whirr – I didn’t completely blend mine, but it should be pretty smooth. [This is a significant deviation from the original recipe, which has you make the onions into a smooth paste in the blender and then the tomatoes blended separately, but, well, I didn’t want to have to clean the blender! Plus my blender doesn’t work as well as an Indian grinder.] Add the salt and garam masala.

    4. Cover and simmer over medium-low heat for 15-20 minutes.

    5. Add the peas. If you are using fresh peas, add them a few minutes earlier since they take a touch longer to cook. Cover and simmer an additional 10 minutes or so.

    extra peas

    6. When you’ve gotten to the end of the simmering time, leave the pot on anyway while you toast the paneer. Heat a small, heavy frying pan over medium-high heat and add the pieces of paneer. Fry, turning often (I used chopsticks) until the pieces have golden spots and are turning crispy at the edges.

    7. Add the paneer to the pot and stir gently. Turn off the stove and let the pot sit for 5-10 minutes, covered, or as long as you can stand it!

    mattar paneer, in the pot

    8. Garnish with chopped coriander leaves (cilantro) and serve with rice, plain or fancy. Ooh, and some yogurt or raita (yogurt with grated cucumber in it) is nice too. Serves 4-5.